Spring is an MVC architecture. One of the best features of Spring is, it supports many technologies for its view layer such as Thymeleaf, Freemaker, JSP etc. Because Thymeleaf is relatively easy, it is considered as a default view technology for Spring.
This post covers configuration of Spring Boot with one of the most common view technology in JAVA - JSP. It also covers little bit of how Spring controllers works.
Tools used for this sample demo
- Eclipse (Oxygen)
- Spring Boot
- Maven - Dependency manager
If you have downloaded latest version of Eclipse IDE for Java EE developers, Maven comes pre installed in it. If you do not have maven plugin you can go to eclipse marketplace and search for Maven Integration for Eclipse anytime and install plugin.
Overview of Maven
Spring allows and its main feature is Dependency Injection. So, in one project there can be many dependencies. Sometimes it is hard to manage all dependencies with their versions. Maven provides an easy way of managing all dependencies. Maven creates Spring project structure with pom.xml file. This file is responsible for including and managing dependencies in Spring.
This demo is about creating user objects and displaying them on jsp pages as a list of users. There are 7 easy steps for this demo.
In eclipse click on File -> New -> Other. Select Spring starter project under Spring Boot folder and click next.
Spring allows and its main feature is Dependency Injection. So, in one project there can be many dependencies. Sometimes it is hard to manage all dependencies with their versions. Maven provides an easy way of managing all dependencies. Maven creates Spring project structure with pom.xml file. This file is responsible for including and managing dependencies in Spring.
This demo is about creating user objects and displaying them on jsp pages as a list of users. There are 7 easy steps for this demo.
- Create project
- Configure pom.xml file
- Configure for JSP
- Create jsp pages
- Create domain class
- Configure controller
- Run project
In eclipse click on File -> New -> Other. Select Spring starter project under Spring Boot folder and click next.
 |
| Add Project |
- Name: Name of the project. I have used is SpringBootJsp
- Type: Type of the project. You can choose between Maven or Gradle (another dependency management tool). I used Maven. If you choose to use Gradle there will be different configuration for pom.xml file.
- Group: Name of your group. Usually it is name of company. I have put com.ssnk
- Artifact: This is a unique id of your project. So, give it a name that is unique in your work space. I gave SpringBootJsp
- Description: Description of your project. I have put Spring Boot Jsp Demo
- Package: Basic folder structure of your project. In another words source folder of the project. I have used it with my group name. com.ssnk.sbj
 |
| Project Details |
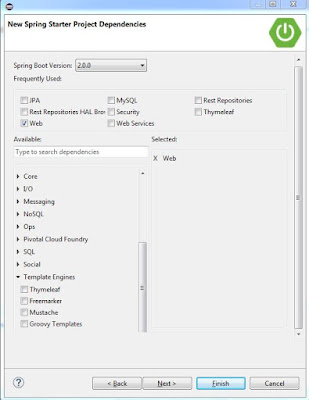
Next screen is for select project dependencies. On this screen there will be all the dependencies and modules provided by Spring available to include in project. There is a section for frequently used dependencies as well, where you can select from dependencies you use frequently. In case you want to include other dependency which is not listed in frequently used, you can search in available dependency search box or browse through all the options on left side of the screen. On the right side box you can see all the dependencies you have selected.
As this is simple web application for demoing JSP technology I have selected two dependencies.
- Web: This provides basic web functionalities such as core HTTP integration, Servlet filters etc.
- DevTools: This dependency is useful to continues refresh of for the page in a browser. Without this dependency any changes you make to any file of the project you will have to restart whole spring module and restart the page on browser. This tool provides automatic restart of the project. So you can just refresh the page in a browser and changes will reflect.
 |
| Select Project Dependencies |
 |
| Project Structure |
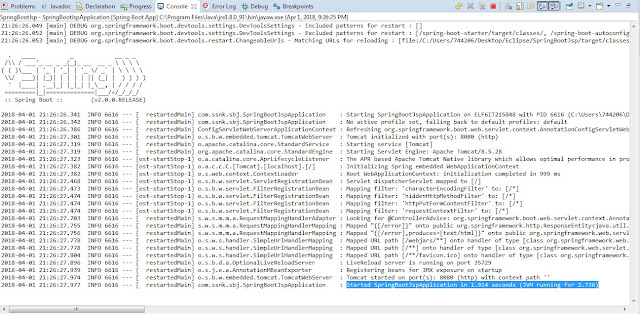
As shown in above image project is created. This is the basic structure of Spring boot project using Maven. In project explorer window right click on project SpringBootJsp. Click Run as --> Spring Boot App. Your project should start successfully. It will give you message on console window as shown in below figure.
2. Configure pom.xml
 |
| Project Started |
As shown in basic structure of the project, there is pom.xml file. We need to configure this file to be compatible with Jsp and servlets.
pom.xml
<?xml version="1.0" encoding="UTF-8"?>
<project xmlns="http://maven.apache.org/POM/4.0.0" xmlns:xsi="http://www.w3.org/2001/XMLSchema-instance"
xsi:schemaLocation="http://maven.apache.org/POM/4.0.0 http://maven.apache.org/xsd/maven-4.0.0.xsd">
<modelVersion>4.0.0</modelVersion>
<groupId>com.ssnk</groupId>
<artifactId>SpringBootJsp</artifactId>
<version>0.0.1-SNAPSHOT</version>
<packaging>jar</packaging>
<name>SpringBootJsp</name>
<description>Spring Boot Jsp demo</description>
<parent>
<groupId>org.springframework.boot</groupId>
<artifactId>spring-boot-starter-parent</artifactId>
<version>2.0.0.RELEASE</version>
<relativePath/> <!-- lookup parent from repository -->
</parent>
<properties>
<project.build.sourceEncoding>UTF-8</project.build.sourceEncoding>
<project.reporting.outputEncoding>UTF-8</project.reporting.outputEncoding>
<java.version>1.8</java.version>
</properties>
<dependencies>
<dependency>
<groupId>org.springframework.boot</groupId>
<artifactId>spring-boot-starter-web</artifactId>
</dependency>
<dependency>
<groupId>org.springframework.boot</groupId>
<artifactId>spring-boot-devtools</artifactId>
<scope>runtime</scope>
</dependency>
<dependency>
<groupId>org.springframework.boot</groupId>
<artifactId>spring-boot-starter-test</artifactId>
<scope>test</scope>
</dependency>
<dependency>
<groupId>org.apache.tomcat.embed</groupId>
<artifactId>tomcat-embed-jasper</artifactId>
</dependency>
<dependency>
<groupId>javax.servlet</groupId>
<artifactId>jstl</artifactId>
</dependency>
</dependencies>
<build>
<plugins>
<plugin>
<groupId>org.springframework.boot</groupId>
<artifactId>spring-boot-maven-plugin</artifactId>
</plugin>
</plugins>
</build>
</project>
- Open pom.xml file.
- Go to Dependencies tab (Look at the tab bar at bottom of the window).
- Click on Add button. Fill the details as below.
- Group Id: org.apache.tomcat.embed
- Artifact Id: tomcat-embed-jasper
- Click Ok.
To add another dependency,
Click on Add button. Fill the details as below.
- Group Id: javax.servlet
- Artifact Id: jstl
After addition of both dependencies your pom.xml file will look like this.
pom.xml
<project xmlns="http://maven.apache.org/POM/4.0.0" xmlns:xsi="http://www.w3.org/2001/XMLSchema-instance"
xsi:schemaLocation="http://maven.apache.org/POM/4.0.0 http://maven.apache.org/xsd/maven-4.0.0.xsd">
<modelVersion>4.0.0</modelVersion>
<groupId>com.ssnk</groupId>
<artifactId>SpringBootJsp</artifactId>
<version>0.0.1-SNAPSHOT</version>
<packaging>jar</packaging>
<name>SpringBootJsp</name>
<description>Spring Boot Jsp demo</description>
<parent>
<groupId>org.springframework.boot</groupId>
<artifactId>spring-boot-starter-parent</artifactId>
<version>2.0.0.RELEASE</version>
<relativePath/> <!-- lookup parent from repository -->
</parent>
<properties>
<project.build.sourceEncoding>UTF-8</project.build.sourceEncoding>
<project.reporting.outputEncoding>UTF-8</project.reporting.outputEncoding>
<java.version>1.8</java.version>
</properties>
<dependencies>
<dependency>
<groupId>org.springframework.boot</groupId>
<artifactId>spring-boot-starter-web</artifactId>
</dependency>
<dependency>
<groupId>org.springframework.boot</groupId>
<artifactId>spring-boot-devtools</artifactId>
<scope>runtime</scope>
</dependency>
<dependency>
<groupId>org.springframework.boot</groupId>
<artifactId>spring-boot-starter-test</artifactId>
<scope>test</scope>
</dependency>
<dependency>
<groupId>org.apache.tomcat.embed</groupId>
<artifactId>tomcat-embed-jasper</artifactId>
</dependency>
<dependency>
<groupId>javax.servlet</groupId>
<artifactId>jstl</artifactId>
</dependency>
</dependencies>
<build>
<plugins>
<plugin>
<groupId>org.springframework.boot</groupId>
<artifactId>spring-boot-maven-plugin</artifactId>
</plugin>
</plugins>
</build>
</project>
3. Configure for JSP
In this step we will configure view technology for Spring boot as JSP. By looking at project structure, find application.properties file and open it. Write these two lines in the file.
spring.mvc.view.prefix=/WEB-INF/jsp/
spring.mvc.view.suffix=.jsp
4. Crate JSP pages
In project explorer in src --> main, create new folder structure webapp --> WEB-INF --> jsp. This is a structure Spring will look for .jsp pages when it runs the project. So, make sure you have this folder structure. In this folder create two jsp files. index.jsp and users.jsp.
index.jsp
 |
| jsp folder |
<!DOCTYPE HTML>
<html>
<head>
<meta charset="UTF-8" />
<title>Welcome</title>
</head>
<body>
<h1>Welcome</h1>
<h2>${message}</h2>
<a href="${pageContext.request.contextPath}/users">User List</a>
</body>
</html>
<html>
<head>
<meta charset="UTF-8" />
<title>Welcome</title>
</head>
<body>
<h1>Welcome</h1>
<h2>${message}</h2>
<a href="${pageContext.request.contextPath}/users">User List</a>
</body>
</html>
Note that in above code <a> tag requests the contextPath in its href attribute which is we have defined as prefix "/WEB-INF/jsp". /users will be the url path with suffix ".jsp".
So, complete link will look something like this <a href="/WEB-INF/jsp/users.jsp">User List </a>
users.jsp
<%@ taglib uri="http://java.sun.com/jsp/jstl/core" prefix="c"%>
<!DOCTYPE HTML>
<html>
<head>
<meta charset="UTF-8" />
<title>Person List</title>
</head>
<body>
<h1>Person List</h1>
<br/><br/>
<div>
<table border="1">
<tr>
<th>First Name</th>
<th>Last Name</th>
</tr>
<c:forEach items="${users}" var ="user">
<tr>
<td>${user.firstName}</td>
<td>${user.lastName}</td>
</tr>
</c:forEach>
</table>
</div>
</body>
</html>
5. Create domain class
Under src-->main-->java folder, create package name model. Add a simple java class to it name User and write code as below.
 |
| Package model |
This is simple java class with two properties FirstName and LastName with their constructors and getters and setters.
User.java
package model;
public class User {
private String firstName;
private String lastName;
public User() {
}
public User(String firstName, String lastName) {
this.firstName = firstName;
this.lastName = lastName;
}
public String getFirstName() {
return firstName;
}
public void setFirstName(String firstName) {
this.firstName = firstName;
}
public String getLastName() {
return lastName;
}
public void setLastName(String lastName) {
this.lastName = lastName;
}
}
6. Configure controller
In src-->main-->java create new package name com.ssnk.sbj.controller. In this package create on class name MainController.java. This is class that manages all your urls. It functions same as web.xml file but in different format. Write down below code to the into it.
MainController.java
package com.ssnk.sbj.controller;
import java.util.ArrayList;
import java.util.List;
import org.springframework.stereotype.Controller;
import org.springframework.ui.Model;
import org.springframework.web.bind.annotation.RequestMapping;
import org.springframework.web.bind.annotation.RequestMethod;
import com.ssnk.sbj.model.User;
@Controller
public class MainController {
private static List<User> users = new ArrayList<User>();
static {
users.add(new User("Bill", "Gates"));
users.add(new User("Steve", "Jobs"));
}
@RequestMapping(value = { "/", "/index" }, method = RequestMethod.GET)
public String index(Model model) {
String message = "Hello Spring Boot + JSP";
model.addAttribute("message", message);
return "index";
}
@RequestMapping(value = { "/users" }, method = RequestMethod.GET)
public String viewPersonList(Model model) {
model.addAttribute("users", users);
return "users";
}
}
There are two useful notations used in above class.
7. Run Project
In src-->main-->java create new package name com.ssnk.sbj.controller. In this package create on class name MainController.java. This is class that manages all your urls. It functions same as web.xml file but in different format. Write down below code to the into it.
MainController.java
package com.ssnk.sbj.controller;
import java.util.ArrayList;
import java.util.List;
import org.springframework.stereotype.Controller;
import org.springframework.ui.Model;
import org.springframework.web.bind.annotation.RequestMapping;
import org.springframework.web.bind.annotation.RequestMethod;
import com.ssnk.sbj.model.User;
@Controller
public class MainController {
private static List<User> users = new ArrayList<User>();
static {
users.add(new User("Bill", "Gates"));
users.add(new User("Steve", "Jobs"));
}
@RequestMapping(value = { "/", "/index" }, method = RequestMethod.GET)
public String index(Model model) {
String message = "Hello Spring Boot + JSP";
model.addAttribute("message", message);
return "index";
}
@RequestMapping(value = { "/users" }, method = RequestMethod.GET)
public String viewPersonList(Model model) {
model.addAttribute("users", users);
return "users";
}
}
- @Controller: Defines that class is the controller class. So, every urls in the website will come through this class first and then controller class will redirect according to the next page.
- @RequestMapping: This annotation maps the HTTP requests to handler methods. If it has more than one uri then there will be array for the values with all pages uris. For example in above code if there is no uri specified ("/") or index uri is specified ("/index") it will check into same method and redirects requests according to it.
- Spring provides different kind of HTTP methods such as GET, POST, PUT, DELETE, PATCH. One of these method will be provided into method attribute of RequestMapping. By default it is GET method.
7. Run Project
If you have done everything correctly above your project should run fine.


No comments:
Post a Comment